Define the Luminaire
- Open a new file. From the File menu, select New, or click on the new icon on the Main toolbar.
We will be working in feet and footcandles for this example. If you have changed your program units, click on the Units button at the bottom of the screen and change to ft/fc.
- Click on the Luminaire toolkit, then click on the Define button.

For the purposes of this lesson we will retrieve the IES file from the “AGi32 Basic Interior Lighting” folder we downloaded previously. This would be a similar workflow to retrieving any IES from your local drive that you might have downloaded from a manufacturer’s website.
IMPORTANT Note: This course uses a real luminaire and IES photometric report provided by our friends at RAB Lighting. While this data is current as of this publication, be aware that products change rapidly and this data will be obsolete at some point (although it does not matter for this exercise). Always check with the manufacturer directly prior to specification.
- Click on the Browse/Recent button at the top of the Define dialog.
- Navigate to the location of the downloaded AGi32 Basic Interior Lighting folder.
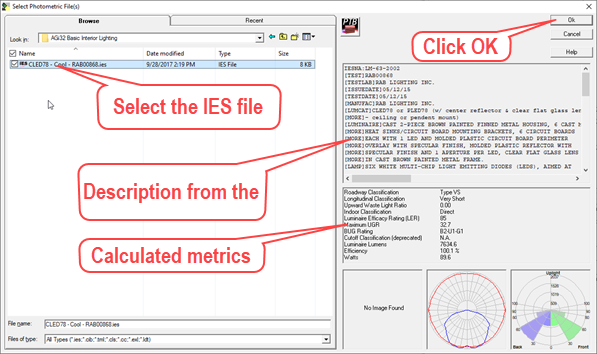
- Click on the IES file.
AGi32 provides a preview of the file contents for any files accessed from Windows Explorer. You can see the manufacturer’s Description from the IES file (often prepared by the test laboratory) as well as metrics calculated by AGi32 and standard polar plot and LCS (BUG) graph.

- Click on the OK button to bring in the IES file.
AGi32’s Smart Symbols dialog will open (Smart Symbols are enabled by default). This process examines the luminous area in the IES file and attempts to match a basic symbol shape and size.

- Select the Suspended Pendant Mounting Type.
- Remove the check mark: Include Pendant in the Definition.
- Change the Vertical Insertion Point location to Bottom.
- Select the Suspended Pendant-Circular Down symbol.
- Click OK.
The luminaire now appears in the Define dialog and is ready to use (or further modify).
Before we move on, make note of the following items:
1. The Label used is the IES filename. This behavior can be changed from the Settings button.
2. The Description is pulled from the LUMCAT keyword in the IES file. This behavior can also be changed using the Settings button.
3. The Luminous Box is a rectangle drawn from the luminous dimensions in the IES file. This is used to size the luminaire symbol (L,W or Diameter).
4. We did not modify the Light Loss Factor. It remains as one.

• Click Close to leave the luminaire Define dialog.


